This exercise has three parts with each more complicated than the first. If you are working as a team of three decide who is going to go first. Each can help the others but this way everyone gets a go with typing in the commands. Swap places after each exercise.
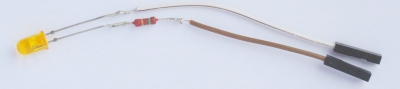
Before switching on your Raspberry Pi connect your LED up as in the picture below. The lead with the resistor goes into Pin 25 and the other into Pin 7.
|
|
This LED has been prepared in advance. A 220 ohm resistor should be soldered to the short lead, cathode – next to flat edge – from the LED. Then half a female connector lead is soldered to both leads enabling quick fitting to the Raspberry Pi.
GPIO pin numbers start from the left as in the picture, closest pin towards you. As pins 7 and 25 are odd numbered ones they are therefore in the closest row to the camera. |
 |
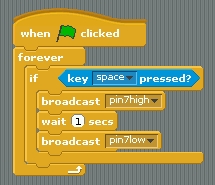
When you are ready and you have checked that the pins are correct turn on the Pi and then get ScratchGPIO started. The solutions to the exercises are at the bottom of the page, but try to do them first before looking.
Exercise One
Open a new Scratch file.
File > New
You now need to be able to switch the LED on and off on command. The two commands that do this are these:
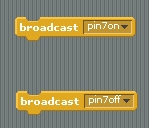
These can be made from the Command part of Scratch by choosing Broadcast and clicking on the small black arrow and selecting New. Type in the command as in the picture.
Now can you program Scratch to switch on the LED for 0.5 seconds when the Space Bar is pressed?
Save your work. Call it something like YourNameLED1.
Exercise Two
Now switch users and try this.
Start with a new file and recreate the same exercise as before. You should have been watching so this should only take you a minute or two.
Now can you extend the instructions so that when the Space Bar is pressed the LED flashes instead of just switching once? Try a pulse of 3 flashes.
Save your work. Call it something like YourName2.
Exercise Three
Switch users again and try this.
Start a New File again and recreate the same as the previous exercise. Have you been watching closely?
Now can you make the LED flash three times, pause, and then repeat three times over? Rather like this:
Flash, flash, flash ,pause, flash, flash, flash ,pause, flash, flash, flash , stop.
Save your work. Call it something like YourName2.
Exercise Four
Now that you have all got the hang of this here is something for all of you to do.

Draw a rectangle with a nice thick border on the Background with enough room for the Scratch Cat to move. Can you program the Cat to move using the arrow keys and whenever he touches the border the LED lights but when he isn’t the LED is off.
The Solutions
Here are the solutions to help if you got stuck.
|
|
|
|
|
|
|
|