In this exercise you will learn to build a simple house. This is achieved by placing a large set of blocks and then placing a block of air inside it effectively mining out the interior. The same technique is used to make a doorway and windows.
As before any code to type is written like this
this is code #with a comment after, this is ignored by the program
Your house can be made from any material you like, just consult the Minecraft block library below.
Minecraft Coordinates
Minecraft uses coordinates just like the maths in class. Sorry about that but if you listened in class you’ll find this easier or when it comes up in class you’ll understand it better because of Minecraft!
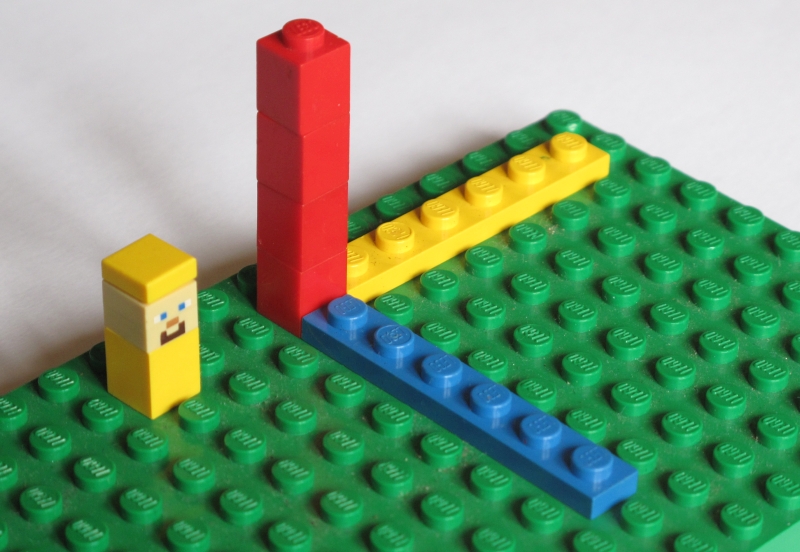 |
How Minecraft coordinates work. Here the blue strip equates to the x axis (east and west). The red is the y axis (up and down) like a graph. Can you see that? Minecraft is in 3D so we need a depth axis into and out of the view and that is the yellow direction or z. The coordinates are written in this order (x, y, z). |
The Code
Open a new file in Geany, or if you’re clever open an old one and use the first few lines of that one. Save As minecraftHouse.py in the Code_Club folder as before. Start coding with:
from mcpi import minecraft #importing the Minecraft module

from mcpi import block #importing the blocks information module

import time as time #importing the time module
Now we need to communicate with the game. Rather like a two way radio we can give it instructions and it can give us information.
#making a link into the Minecraft game called mc

mc=minecraft.Minecraft.create()
The house can be built anywhere. The problem with that is you will have to find it! It would be easier if it was built somewhere close to the player. So the first command is to get the position of the player and call it the variable me.
# Find player position (me) by finding position of block under their feet

me = mc.player.getTilePos()
This will return to the program the coordinate of the block under the player’s feet. (The command getPlayerPos gets the players position on the block under their feet). This is in the form of x, y, and z. The x coordinates can be thought of being the east and west direction, z the north south and y the up down.
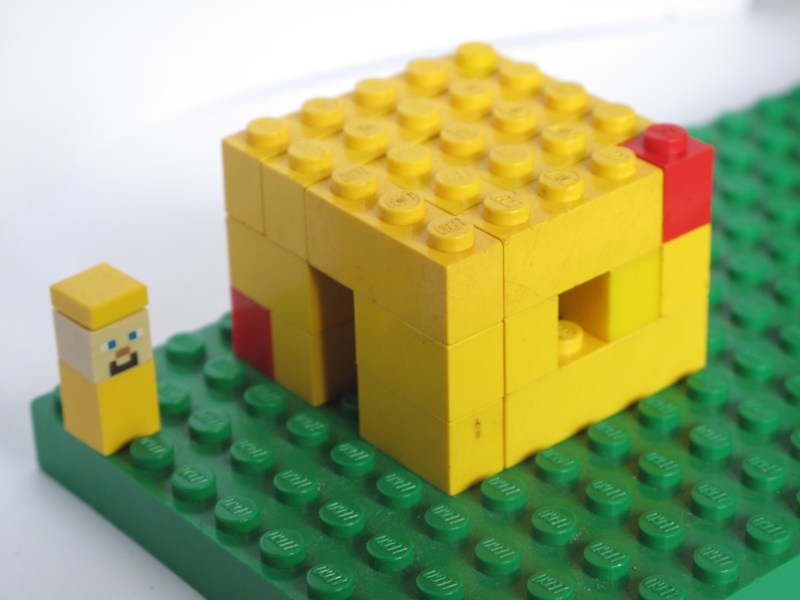 |
The house that you built. Or it will be soon. Use this to guide you in understanding the coordinates. The setBlocks command uses the two red Lego brick positions to build the whole block of the yellow bricks. A similar command though slightly smaller will place a block of air inside hollowing out the block. The door and windows are done a similar way. |
The code places the bottom corner of the block three x blocks away (east). The far top corner is seven x blocks away and four z blocks away and three y blocks up. Count them on the picture to see.
# Build a block of blocks to make the building here wood is no. 5

mc.setBlocks(me.x+3, me.y, me.z, me.x+7, me.y+2, me.z+4, 5)
# Remove interior by adding a block of air 0 slightly smaller than previous block

mc.setBlocks(me.x+4, me.y, me.z+1, me.x+6, me.y+1, me.z+3, 0)
# Make a door by adding a two blocks of air

mc.setBlocks(me.x+3, me.y, me.z+2, me.x+3, me.y+1, me.z+2, 0)
# Add first window of air, notice the setBlock not setBlocks command.

mc.setBlock(me.x+5, me.y+1, me.z, 0)
# Add second window of air on opposite wall

mc.setBlock(me.x+5, me.y+1, me.z+4, 0)
If you want the windows can be of glass. Can you do that? And the building does not have to be of wood either.
Save the program. So let’s run it and see what happens. Hopefully you will end up with the house in the picture, if you chose to use the gold blocks.
Run Minecraft and Run Your Program
From the Menu in the top left hand corner open Minecraft from the Games menu.
Place the Minecraft window into a corner to give you some room. Move the character to somewhere in an open space. Press Tab to release the mouse from the game. Now open an LXTerminal and type:
cd Code_Club
python minecraftHouse.py
If all is well the program will run and place a house not very far away from Steve. If the house is not quite right check your code and debug it. If it was right, try changing the building material? Place Steve somewhere else and build another and another. You could make a whole street of small house really quickly. Try it.
Make Another Street of Houses
Moving the Steve character and rerunning the program to build another house is all very well. But Python can do it a lot quicker for you.
All that is needed is for the program to run the sequence for placing the blocks again but in a different position. For a street of houses it is just a matter of adding a bit more to the y coordinates so that the houses are all facing out. If you change the x position all the doors would face the back of the previous house. Of course, if you change the y coordinate all the houses would be built on top of one another. And you wouldn’t want that would you? Would you??
So let’s go back to the program in Geany. Do a Save As with the program to save a new copy calling it minecraftStreet.py.
We need to make a loop that rebuilds a house and also adds a figure to the original coordinates again and again. Place the following code before the first setBlocks command. Set two variables with names such as these:
house_number = 1 #build the first house as number one in our street

move_along = 7 #build the corner of the next house 7 blocks further along
Now the command for the loop. We need to check that the street is not too long so maybe 5 houses is a start.
while house_number < 6:
The setBlock lines already in the program now need to be placed inside the while command. This means that you need to indent them. Place the curser at the front of a line and hit tab once for each line. It should look like this. I’ve left the comments out to make it easier to read but leave yours in:
while house_number < 6:
____mc.setBlocks(me.x+3, me.y, me.z, me.x+7, me.y+2, me.z+4, 5)
____mc.setBlocks(me.x+4, me.y, me.z+1, me.x+6, me.y+1, me.z+3, 0)
____mc.setBlocks(me.x+3, me.y, me.z+2, me.x+3, me.y+1, me.z+2, 0)
____mc.setBlock(me.x+5, me.y+1, me.z, 0)
____mc.setBlock(me.x+5, me.y+1, me.z+4, 0)
Now if this was run it would run indefinitely. The house_number would never reach 6 and all the houses would also be built on the same spot. So we need to add a one to the house_number and also move the builders along the street. If we also put a small delay in we may see the houses appearing one after the other in the game. So now add after the previous code and still indented:
____time.sleep(2) #delay of 2 seconds
____house_number += 1 #add 1 to house number
____move_along += 7 #add 7 to the distance from the first corner
Finally we need to add the move_along distance to the z coordinate as mentioned before. The first house will be built where z is the player’s coordinate value (that’s the first z mentioned in the first setBlocks above). The second house has 7 added to z, the third will have another 7 added again so it will be 14 away from the first. And so on.
So add to all the z coordinates in all the setBlocks and setBlock commands :
+ move_along
So for example the first line would now read (remember the indent):
____mc.setBlocks(me.x+3, me.y, me.z+move_along, me.x+7, me.y+2, me.z+4+move_along, 5)
Save the file and run in Minecraft. Any problems? Then it is time to debug again.
Something a bit different
How about making a house with a roof of a different material? Can you do it? And how about a path to each door of gravel and a road going down the street? Or maybe a tower block of houses going up instead of along?
Minecraft Block Names and ID
These are the list of available blocks to build with in the program. Use the number as outlined above like this:
mc.setBlock(x, y, z, 1) #which will place a stone block number 1
or
mc.setBlock(x, y, z, block.STONE.id) #same thing but note the use of CAPITAL NAME
| 0 => “Air” | 1 => “Stone” | 2 => “Grass” |
| 3 => “Dirt” | 4 => “Cobblestone” | 5 => “WoodenPlank” |
| 6 => “Sapling” | 7 => “Bedrock” | 8 => “Water” |
| 9 => “StationaryWater” | 10 => “Lava” | 11 => “StationaryLava” |
| 12 => “Sand” | 13 => “Gravel” | 14 => “GoldOre” |
| 15 => “IronOre” | 16 => “CoalOre” | 17 => “Wood” |
| 18 => “Leaves” | 19 => “Sponge” | 20 => “Glass” |
| 21 => “LapisLazuliOre” | 22 => “LapisLazuliBlock” | 23 => “Dispenser” |
| 24 => “Sandstone” | 25 => “NoteBlock” | 26 => “Bed” |
| 27 => “PoweredRail” | 28 => “DetectorRail” | 29 => “StickyPiston” |
| 30 => “Cobweb” | 31 => “TallGrass” | 32 => “DeadShrub” |
| 35 => “Wool” | 37 => “YellowFlower” | 38 => “CyanFlower” |
| 39 => “BrownMushroom” | 40 => “RedMushroom” | 41 => “BlockofGold” |
| 42 => “BlockofIron” | 44 => “StoneSlab” | 45 => “Brick” |
| 46 => “TNT” | 47 => “Bookcase” | 48 => “MossStone” |
| 49 => “Obsidian” | 50 => “Torch” | 51 => “Fire” |
| 52 => “MobSpawner” | 53 => “WoodenStairs” | 56 => “DiamondOre” |
| 57 => “BlockofDiamond” | 58 => “Workbench” | 59 => “Wheat” |
| 60 => “Farmland” | 61 => “Furnace” | 62 => “Furnace” |
| 63 => “Sign” | 64 => “WoodDoor” | 65 => “Ladder” |
| 66 => “Rails” | 67 => “CobblestoneStairs” | 68 => “Sign” |
| 71 => “IronDoor” | 73 => “RedstoneOre” | 78 => “Snow” |
| 79 => “Ice” | 80 => “SnowBlock” | 81 => “Cactus” |
| 82 => “ClayBlock” | 83 => “SugarCane” | 85 => “Fence” |
| 87 => “Netherrack” | 88 => “SoulSand” | 89 => “Glowstone” |
| 96 => “Trapdoor” | 98 => “StoneBricks” | 99 => “BrownMushroom” |
| 100 => “RedMushroom” | 102 => “GlassPane” | 103 => “Melon” |
| 105 => “MelonVine” | 107 => “FenceGate” | 108 => “BrickStairs” |
| 109 => “StoneBrickStairs” | 112 => “NetherBrick” | 114 => “NetherBrickStairs” |
| 128 => “SandstoneStairs” | 155 => “BlockofQuartz” | 156 => “QuartzStairs” |
| 245 => “StoneCutter” | 246 => “GlowingObsidian” | 247 => “NetherReactorCore” |